It doesn’t make a difference what temperature a room is, it’s always room temperature.
Steven Wright
It doesn’t make a difference what temperature a room is, it’s always room temperature.
Steven Wright
ARDUINO: TEMPERATURE LOGGER
09/01/2012
This weekend’s fun is a temperature logger. What I am curious about is how quickly my coffee cools off and what I can do to slow that down. More on that next time; for now, I need to build something that can measure temperature in liquids and that can record that temperature so I can plot it. Sounds like a job for Arduino.
Fortunately, several others have done this. My explorations and this post are based heavily on what they’ve done. The first part is using a data logging shield for the Arduino, and ladyada has a great description of the shield, how to make it, how to test, and how to make it a data logger. The second part is to use an immersible temperature probe. For this, the Arduino Playground was the most helpful. All of my code is modified from these two sources.
For this project, you’ll need a few items:
I bought the data logging shield and the temperature sensor from MakerShed. The Data Logging Shield was $19.50, and the temperature sensor was $12.00. The logging shield comes as parts, which must be soldered together. I took my time and was done in an hour. The temperature sensor requires no assembly, but I soldered jumper wires onto the sensor leads to give me a little more space.
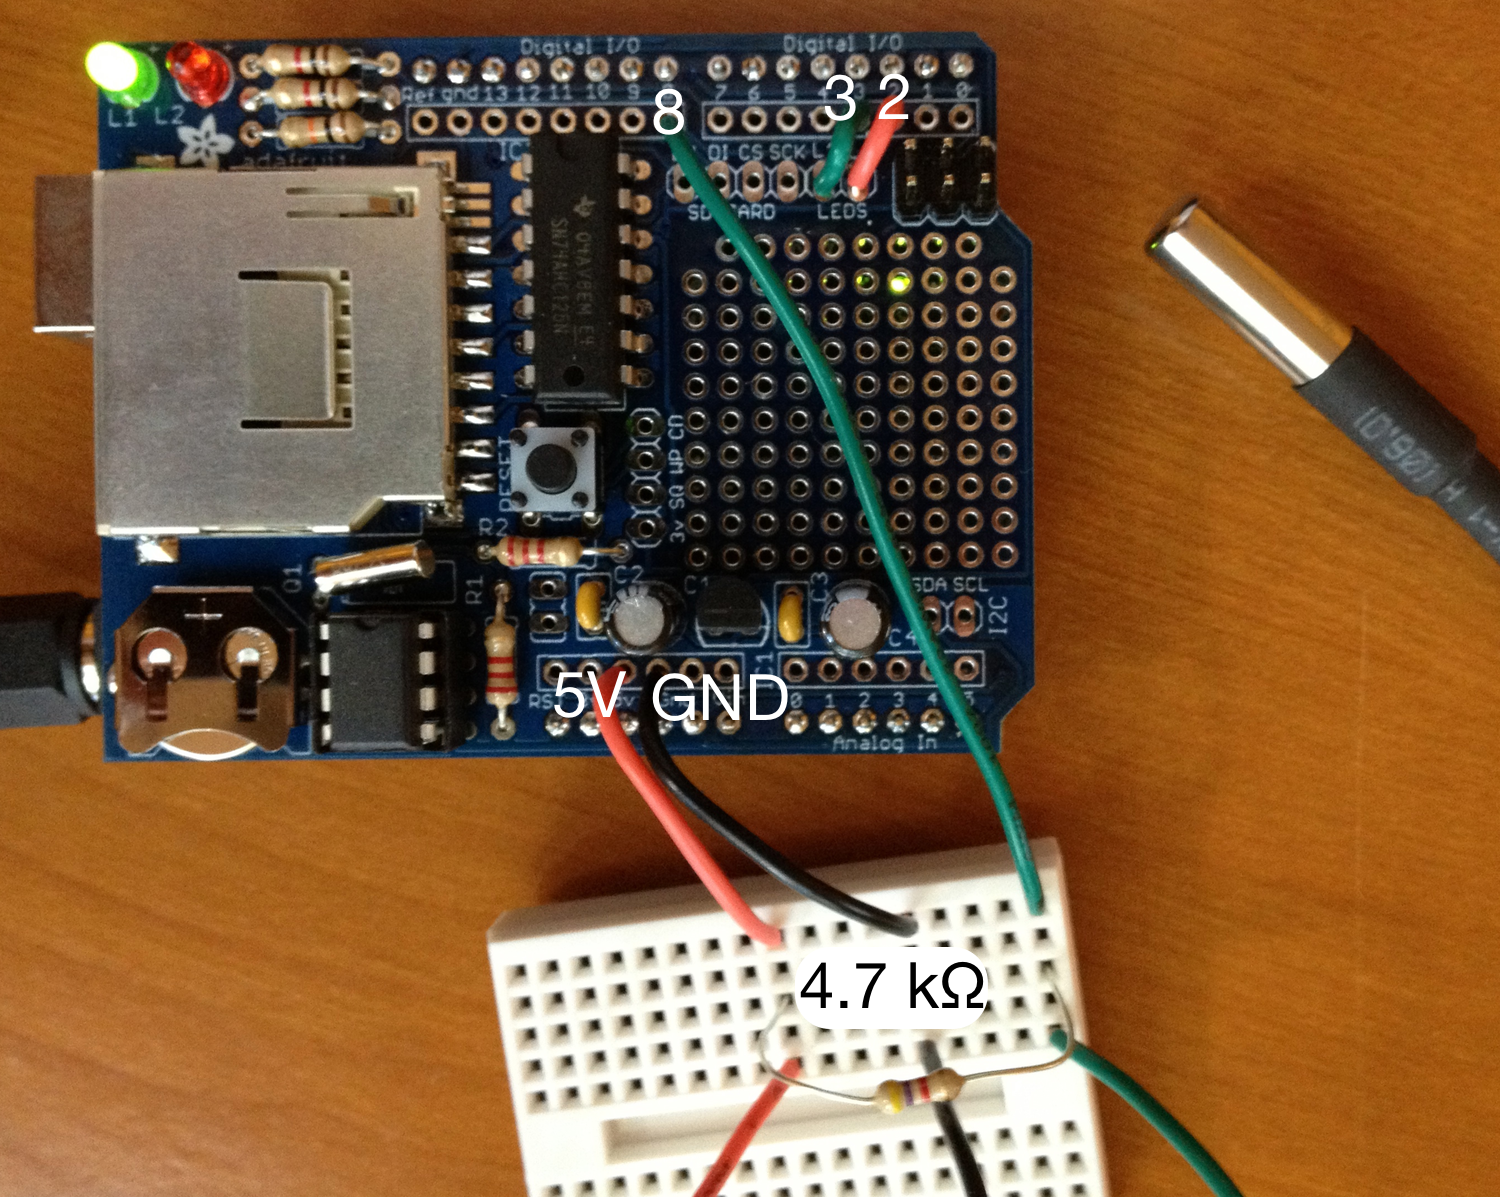
The full circuit can be seen by clicking on the photo above. The red, black, and green wires coming off the breadboard are soldered to the red (power), black (ground), and white (data) wires from the temperature sensor. The business end of the sensor is the silver tip in the upper right of the picture.The red lead from the sensor should be connected to the 5V pin on the data logging shield, and the black lead should be connected to GND on the shield. The green data lead from the sensor should be connected to digital pin 8 on the shield. A 4.7 kΩ resistor bridges the 5V power lead and the data lead from the sensor. I also wired in the two on-board LEDs, as they act as indicator lights when data is written (or fails to write). The green LED is indicated by the green jumper that connects to pin 3, and the red LED is indicated by the jumper to pin 2.
The Arduino commands have several functions. The getTemp() function handles the reading of the probe data and its conversion into degrees Celsius; it returns the temperature. The writeDataToCard will write the time and the temperature on a single line, with the values separated by a comma. The standard setup() function declares the pins, records the starting time, opens the serial port, and tests the card for writing. The loop() function gets the time and temperature, and if the temperature is not the error value, will write the data to the SD card and flash the green LED. If a temperature-reading error occurs, the red LED is flashed. The pauseBetweenReadings variable is used to set how frequently (in milliseconds) data will be recorded; I set mine to 10000 milliseconds, or 10 seconds.
To measure temperature, upload the code to your Arduino board, and logging should begin immediately. If data writing is successful, the green LED on the data logging shield will flash. The code is set up to read temperature and record it every ten seconds. If the writing fails, such as when the temperature cannot be recorded, the red LED will flash. Unplug the Arduino when you are done recording data, then open the SD card on your computer (my MacBook Air has an SD slot) and read the text file ("TEMPER.TXT" in this example).
Here is the Arduino code:
#include <SD.h>
#include <OneWire.h>
File myFile;
int sdCardPin = 10;
int temperatureProbePin = 8;
int greenLEDPin = 3;
int redLEDPin = 2;
int pauseBetweenReadings = 5000; // in milliseconds
int timeForLitLED = 1000;
uint32_t startTime;
int probeErrorCode = -1000;
OneWire ds(temperatureProbePin);
void setup() {
pinMode(sdCardPin, OUTPUT);
pinMode(greenLEDPin, OUTPUT);
pinMode(redLEDPin, OUTPUT);
startTime = millis();
Serial.begin(9600);
// SET UP SD CARD FOR WRITING
if (!SD.begin(sdCardPin)) {
Serial.println("initialization failed!");
return;
} else {
Serial.println("SD card initialized");
myFile = SD.open("temper.txt", FILE_WRITE); // open file for writing
if (myFile) { // if file can be opened, write to it
myFile.print("temperature");
Serial.print("temper.txt file opened for writing");
myFile.close();
} else { // if not, show an error
Serial.println("ERROR: not able to open temperature.txt");
}
}
}
void loop() {
uint32_t timeNow = (millis() - startTime)/1000;
float temperature = getTemp();
if (temperature != probeErrorCode) {
writeDataToCard(timeNow, temperature);
digitalWrite(greenLEDPin, HIGH);
} else {
digitalWrite(redLEDPin, HIGH);
}
delay(timeForLitLED);
digitalWrite(redLEDPin, LOW);
digitalWrite(greenLEDPin, LOW);
delay(pauseBetweenReadings-timeForLitLED);
}
float getTemp() {
byte data[12];
byte addr[8];
if ( !ds.search(addr)) {
//no more sensors on chain, reset search
ds.reset_search();
return -1000;
}
if ( OneWire::crc8( addr, 7) != addr[7]) {
Serial.println("CRC is not valid!");
return -1000;
}
if ( addr[0] != 0x10 && addr[0] != 0x28) {
Serial.print("Device is not recognized");
return -1000;
}
ds.reset();
ds.select(addr);
ds.write(0x44,1);
byte present = ds.reset();
ds.select(addr);
ds.write(0xBE);
for (int i = 0; i < 9; i++) {
data[i] = ds.read();
}
ds.reset_search();
int LowByte = data[0];
int HighByte = data[1];
float TRead = (HighByte << 8) + LowByte;
float Temperature = TRead / 16;
return Temperature;
}
void writeDataToCard(uint32_t time, float temperature) {
myFile = SD.open("temper.txt", FILE_WRITE);
myFile.print(time);
myFile.print(", ");
myFile.print(temperature);
myFile.print("\n");
myFile.close();
}