It’s not the heat, it’s the humidity.
proverb
It’s not the heat, it’s the humidity.
proverb
ARDUINO: WEATHER MONITOR
11/02/2012
I’ve graduated from temperature to other environmental data: humidity and pressure. For this installment, I’ll show a slightly more involved circuit using two excellent sensors from Sparkfun. I’ll also use a two-line LCD display to show the current readings.
The circuitry builds on published examples for the humidity sensor by Jim Lindblom and for the liquid crystal display by David Mellis, Limor Fried, and Tom Igoe.
For this project, you’ll need a few items:
The barometric pressure sensor is available for $19.95 and the humidity pressure sensor is available for $16.95. These sensors lack pins out of the box, so you’ll want to solder some male header pins onto them to make them easy to plug into a breadboard.
I bought the LCD from MakerShed for $12.00; you can buy a similar one from Adafruit for $9.95. The LCD also lacks pins, and you’ll want to solder male header pins onto it.
Sparkfun provides a good tutorial for the humidity sensor, which is very easy to connect and use. The sensor has three pins: 5V (for 5 volts in), GND (for ground), and OUT, which returns a variable voltage that will be read on one of the Arduino’s analog pins. It is a 10-bit output, so it returns a value between 0 (indicating a voltage of 0 V) and 1023 (indicating a voltage of 5 V). To determine the relative humidity (in percent), you read the input with analogRead(), convert it to voltage, then use a linear conversion to turn it into percentRH. This conversion is supplied in the tutorial mentioned above and in the sensor datasheet.
Sparkfun also provides a clear tutorial for the barometric pressure sensor, and a datasheet available. This is only barely more complicated to wire up, but the code behind it is substantially more involved than that of the humidity sensor. This sensor provides temperature data in addition to air pressure readings. The sensor has six pins: SDA (serial data input and output), SCL (serial clock input and output), XCLR (master reset), EOC (end of conversion, triggered when a temperature or pressure conversion has finished), GND (ground), and VCC (3.2 V input). For this project, we won’t need the XCLR and EOC pins. The SDA and SCL pins get connected to analog-in pins on the Arduino, and communicating with the sensor requires the Wire library in the Arduino sketch. Because the process of reading from the sensor is complicated, I recommend reading Sparkfun’s tutorial for the details. Here, I’ve simply included that code as is.
The LCD is the most complicated of all to set up, but again there are good tutorials at Adafruit, among others. The LCD has 16 pins, numbered from 1 (the pin closest to the edge of the board) to 16 (the pin near the middle of the LCD), but we will not need all of them. Pins 15 and 16 supply power to the backlight. If we connect a potentiometer to pin 3, and connect pins 1 and 2 to power and ground, we can control the contrast of the display (and I recommend this). Pins 4-6 and 11-14 will be used for communicating with the Arduino; for an explanation of these pins, see the tutorial at Adafruit. To communicate with the Arduino, we will need the LiquidCrystal library, but this is already built in, so we don’t need to specifically add it to our sketch. The lcd() function will be used to specify the Arduino digital pins that connect to the LCD. The lcd.print() function is used to print to the display, much like the Serial.print() function. Anything longer than 16 characters will be cut off. To control where the cursor is placed, use lcd.setcursor(a,b), where the a parameter is the line number (0 or 1) and b is the character position (0 to 15).
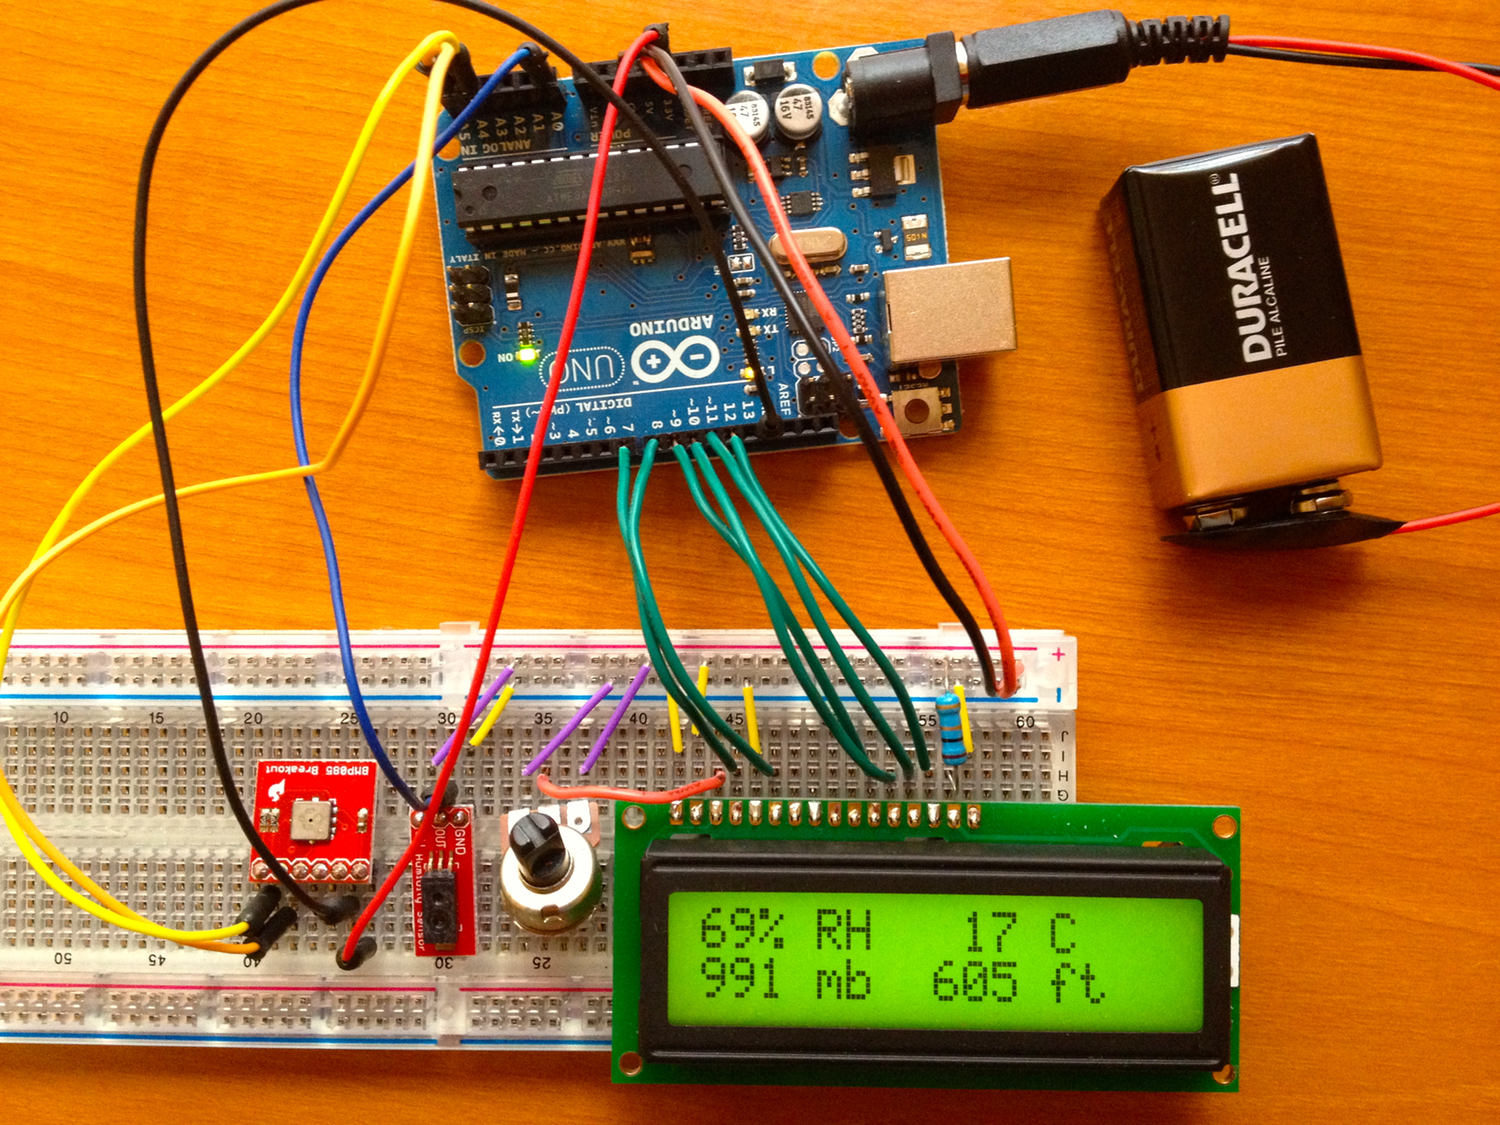
The full circuit can be seen by clicking on the photo above. Because some of the connections may be hard to see in the picture, I’ll list all of them. Run one lead (red in the photo) from the 5V on the Arduino to the positive rail of the breadboard, and run another lead (black) from GND on the Arduino to the negative rail of the breadboard.
First, let’s hook up the LCD. We will also need a potentiometer to control the brightness of the LCD backlight. Make the following connections:
Working our way left across the breadboard, we’ll connect the humidity sensor, the smaller and more rectangular of the two sensors. Make the following connections:
Finishing up, make the following connections for the barometric pressure sensor, which will also give us temperature data:
The code instructs the Arduino to take readings every 5 seconds (5000 milliseconds). It reads the temperature and converts it to both Celsius and Fahrenheit. It also reads the barometric pressure, converts it to millibars, and expresses it as an altitude above sea level. Because weather systems change the barometric pressure, this altitude can be rather inaccurate. Last, it reads the voltage from the humidity sensor and converts it to relative humidity. I have the LCD set up to display the humidity and temperature (in Celsius) on line 1, with pressure in millibars and altitude in feet on line 2, but these are easily changed to display the data in other formats.
Here is the Arduino code:
// license: CC BY-SA v3.0 - http://creativecommons.org/licenses/by-sa/3.0/
#include <Wire.h>
#include <LiquidCrystal.h>
#define BMP085_ADDRESS 0x77 // I2C address of BMP085
const unsigned char OSS = 0; // Oversampling Setting
// Calibration values
int ac1;
int ac2;
int ac3;
unsigned int ac4;
unsigned int ac5;
unsigned int ac6;
int b1;
int b2;
int mb;
int mc;
int md;
// b5 is calculated in bmp085GetTemperature(...), this variable is also used in bmp085GetPressure(...)
// so ...Temperature(...) must be called before ...Pressure(...).
long b5;
short temperature;
long pressure;
const float p0 = 101325; // Pressure at sea level (Pa)
float altitude;
float adc = 0;
float voltage = 0;
float relativeHumidity = 0;
int humiditySensorPin = 0; // Analog Pin 0
// initialize the library with the numbers of the interface pins
LiquidCrystal lcd(7, 8, 9, 10, 11, 12);
void setup() {
lcd.begin(16, 2);
Wire.begin();
bmp085Calibration();
}
void loop() {
temperature = bmp085GetTemperature(bmp085ReadUT());
float degreesC = temperature / 10;
float degreesF = degreesC * 1.8 + 32;
pressure = bmp085GetPressure(bmp085ReadUP());
float millibar = pressure/100;
altitude = (float)44330 * (1 - pow(((float) pressure/p0), 0.190295)) * 3.28084;
adc = analogRead(humiditySensorPin); // Read sensor adc voltage (adcValue is 0-1023)
voltage = (adc/1023.0)*5.0; // Convert adc to voltage (5V circuit)
relativeHumidity = (voltage-0.958)/0.0307; // Convert voltage to relative humidity
lcd.setCursor(0, 0); // column, line
lcd.print(relativeHumidity,0);
lcd.print("% RH ");
lcd.setCursor(9, 0);
lcd.print(degreesC, 0);
lcd.print(" C ");
lcd.setCursor(0, 1);
lcd.print(millibar, 0);
lcd.print(" mb ");
lcd.setCursor(8, 1);
lcd.print(altitude, 0);
lcd.print(" ft");
delay(5000);
}
// Stores all of the bmp085’s calibration values into global variables
// Calibration values are required to calculate temp and pressure
// This function should be called at the beginning of the program
void bmp085Calibration() {
ac1 = bmp085ReadInt(0xAA);
ac2 = bmp085ReadInt(0xAC);
ac3 = bmp085ReadInt(0xAE);
ac4 = bmp085ReadInt(0xB0);
ac5 = bmp085ReadInt(0xB2);
ac6 = bmp085ReadInt(0xB4);
b1 = bmp085ReadInt(0xB6);
b2 = bmp085ReadInt(0xB8);
mb = bmp085ReadInt(0xBA);
mc = bmp085ReadInt(0xBC);
md = bmp085ReadInt(0xBE);
}
// Calculate temperature given ut.
// Value returned will be in units of 0.1 deg C
short bmp085GetTemperature(unsigned int ut) {
long x1, x2;
x1 = (((long)ut - (long)ac6)*(long)ac5) >> 15;
x2 = ((long)mc << 11)/(x1 + md);
b5 = x1 + x2;
return ((b5 + 8)>>4);
}
// Calculate pressure given up
// calibration values must be known
// b5 is also required so bmp085GetTemperature(...) must be called first.
// Value returned will be pressure in units of Pa.
long bmp085GetPressure(unsigned long up) {
long x1, x2, x3, b3, b6, p;
unsigned long b4, b7;
b6 = b5 - 4000;
// Calculate B3
x1 = (b2 * (b6 * b6)>>12)>>11;
x2 = (ac2 * b6)>>11;
x3 = x1 + x2;
b3 = (((((long)ac1)*4 + x3)<<OSS) + 2)>>2;
// Calculate B4
x1 = (ac3 * b6)>>13;
x2 = (b1 * ((b6 * b6)>>12))>>16;
x3 = ((x1 + x2) + 2)>>2;
b4 = (ac4 * (unsigned long)(x3 + 32768))>>15;
b7 = ((unsigned long)(up - b3) * (50000>>OSS));
if (b7 < 0x80000000)
p = (b7<<1)/b4;
else
p = (b7/b4)<<1;
x1 = (p>>8) * (p>>8);
x1 = (x1 * 3038)>>16;
x2 = (-7357 * p)>>16;
p += (x1 + x2 + 3791)>>4;
return p;
}
// Read 1 byte from the BMP085 at "address"
char bmp085Read(unsigned char address) {
unsigned char data;
Wire.beginTransmission(BMP085_ADDRESS);
Wire.write(address);
Wire.endTransmission();
Wire.requestFrom(BMP085_ADDRESS, 1);
while(!Wire.available())
;
return Wire.read();
}
// Read 2 bytes from the BMP085
// First byte will be from "address"
// Second byte will be from "address"+1
int bmp085ReadInt(unsigned char address) {
unsigned char msb, lsb;
Wire.beginTransmission(BMP085_ADDRESS);
Wire.write(address);
Wire.endTransmission();
Wire.requestFrom(BMP085_ADDRESS, 2);
while(Wire.available()<2)
;
msb = Wire.read();
lsb = Wire.read();
return (int) msb<<8 | lsb;
}
// Read the uncompensated temperature value
unsigned int bmp085ReadUT() {
unsigned int ut;
// Write 0x2E into Register 0xF4
// This requests a temperature reading
Wire.beginTransmission(BMP085_ADDRESS);
Wire.write(0xF4);
Wire.write(0x2E);
Wire.endTransmission();
// Wait at least 4.5ms
delay(5);
// Read two bytes from registers 0xF6 and 0xF7
ut = bmp085ReadInt(0xF6);
return ut;
}
// Read the uncompensated pressure value
unsigned long bmp085ReadUP() {
unsigned char msb, lsb, xlsb;
unsigned long up = 0;
// Write 0x34+(OSS<<6) into register 0xF4
// Request a pressure reading w/ oversampling setting
Wire.beginTransmission(BMP085_ADDRESS);
Wire.write(0xF4);
Wire.write(0x34 + (OSS<<6));
Wire.endTransmission();
// Wait for conversion, delay time dependent on OSS
delay(2 + (3<<OSS));
// Read register 0xF6 (MSB), 0xF7 (LSB), and 0xF8 (XLSB)
Wire.beginTransmission(BMP085_ADDRESS);
Wire.write(0xF6);
Wire.endTransmission();
Wire.requestFrom(BMP085_ADDRESS, 3);
// Wait for data to become available
while(Wire.available() < 3)
;
msb = Wire.read();
lsb = Wire.read();
xlsb = Wire.read();
up = (((unsigned long) msb << 16) | ((unsigned long) lsb << 8) | (unsigned long) xlsb) >> (8-OSS);
return up;
}