SWIFT ON RASPBERRY PI
04/16/2017
Since being open-sourced by Apple, Swift has been ported to a a variety of platforms, which is good news not only for code reuse and writing in a consistent language, but also because Swift has many good features. I like writing in Swift, in part because it forces me to think critically about what each method returns.
At Cocoaheads (Atlanta) last Thursday, Robert Walker presented a great introduction to Swift on the server. He showed a slide with IBM’s Swift Package Catalog, and the first featured package was Swifty GPIO, a Swift library that would let you interact with the GPIO pins on a Raspberry Pi.
I was intrigued and set out to do the Hello, World of input/output pins: blink an LED using Swift.
In a day of tinkering, I discovered that although this can be done without too much effort, there are plenty of potential pitfalls, in part stemming from the infancy of bringing Swift to a platform that may not have a consistent set of software installed. There are also different solutions for different Raspberry Pi models, so what I describe below is for a Raspberry Pi B+, and I will start from scratch. A Raspberry Pi 3 will arrive in the mail tomorrow, and I’ll write another post for that device.
Installing the Raspbian OS
The first step is to install an OS the Raspberry Pi, which you will need to do only if this is your first time at using a Pi. Different operating systems are available for the Pi, such as Raspbian and Ubuntu. I’ve used Raspbian before, so that’s what I’ll use here. The Raspbian diskimage can be downloaded Raspberry Pi. You can choose between the regular disk image (Jessie, with the Pixel GUI) or the lite version, which lacks the GUI. I used the regular version, although it was unnecessary as I did everything in the terminal. The download takes a while, as the disk image is 4.3 GB uncompressed.
You will need to format a microSD card on which to install the disk image, and this Stack Overflow question was helpful. First, view the list of disks in the terminal with diskutil list, then insert the microSD card in a card reader into your Mac, the run diskutil list again to see what has changed. Pay attention to the volume number; it should look something like /dev/disk2s1. Be sure to get this right; if you use the wrong number in the next step, you will permanently lose data on some other volume. To format the partition as DOS FAT 32, type the following, using your volume number:
diskutil eraseVolume FAT32 BOOT /dev/disk2s1
Eject the disk, reinsert it, and run diskutil list again to get the disk number, which should looks something like /dev/disk2. Unmount (not eject) the disk using your disk number:
diskutil unmountDisk /dev/disk2
Copy the Raspbian diskimage to the microSD card, using the following command (in one line), paying attention to the disk number. This will take several minutes. Get some coffee and warm up a pop-tart.
sudo dd if=/Users/sholland/Desktop/2017-04-10-raspbian-jessie.img of=/dev/rdisk2 bs=1m
Eject the microSD card, again making sure the disk number is correct:
diskutil eject /dev/disk2
Insert the microSD card into the Raspberry Pi and start it up. If this is your first time running the Pi, you will need to set your keyboard and wifi. For Keyboard, go to the Raspberry Pi menu (in the upper left) ... Preferences ... Keyboard, and choose your correct keyboard type. I am using a spare USB Mac keyboard, so I set my keyboard type to US (Macintosh). This step is necessary to make sure the keys map correctly. For example, before I did this, the double-quotes symbol on the keyboard produced an ampersand on the screen. It’s hard to write code that way. For wifi, go to the icon in the upper right that has two red X’s, and set your wifi name and password there. You will need wifi to download the Swift packages and to update your Pi software.
Installing Swift on Raspberry Pi
This step caused me the most false starts, and in retrospect, most of them were because I misremembered that I had a Raspberry Pi B+, not a model 2. The chips and instruction sets on the various Pi models differ, so be sure to follow the instructions specific to your model.
Umberto Raimondi’s blog was the most helpful, especially his post on Swift 3 for the ARMv6, which covers all of the Raspberry Pi 1 and new Zero models. Umberto is also the person behind SwiftyGPIO; how convenient! The only change I made to his instructions was that I substituted an updated link for Swift 3.0.2, the most recent version available for the Pi. That link was from another of Umberto’s posts, this one on Swift 3.0.2 for all Raspberry Pi platforms; see the link for “Get it here” under ARMv6 near the top of the page.
To install Swift on the Raspberry Pi, launch the terminal app on the Pi, and type the following.
sudo apt-get update
sudo apt-get upgrade
sudo apt-get install clang
wget https://www.dropbox.com/s/dkrkt9ht1c3hog2/swift-3.0.2-RPi1Zero-RaspbianNov16.tgz
tar xzf swift-3.0.2-RPi1Zero-RaspbianNov16.tgz
The first two lines update the software on the Pi, a good practice before installing new software. The third line installs clang, the compiler. The fourth line retrieves Swift, and the fifth and final line uncompresses and installs it in /home/pi/usr/bin.
Finally, write a short program to verify that you can compile and run a Swift program. In the terminal app on the Pi, launch the nano text editor and create a file called main.swift:
nano main.swift
Inside nano, type:
print("Hello, World")
Type ctrl-X, followed by Y to close and save the file. The entry point for a swift program is main.swift, so it is good practice to name your file this way. If you don’t, you might see an error during compilation about expressions not being allowed at the top level.
To run the file as a script, type:
/home/pi/usr/bin/swift main.swift
To compile the program and run it, type:
/home/pi/usr/bin/swiftc main.swift
./main
These two commands can also be combined into a single line:
/home/pi/usr/bin/swiftc main.swift && ./main
Testing the GPIO pins on the Raspberry Pi
Before diving into SwiftyGPIO, it’s a good idea to test that the GPIO pins on the Raspberry Pi work, a point made well by Mister Cameron. This is made easier by installing WiringPi, which allows these tests to be made from the command line. These instructions are repeated from the WiringPi site. Type the following into the terminal app on the Pi:
sudo apt-get purge wiringpi
hash -r
sudo apt-get install git-core
cd
git clone git://git.drogon.net/wiringPi
cd ~/wiringPi
./build
gpio -v
gpio readall
cd wiringPi/gpio
./pintest
The first pair of lines deletes any wiringpi code that may currently be on the Pi; a version of wiringpi is installed by default, but it doesn’t perform all the tasks we’ll need. The next line installs git if it is not already installed (it likely is). The next three lines downloads the wiringPi code and installs it. The last four lines are tests that it is installed correctly. The final line should show that all the pins are OK.
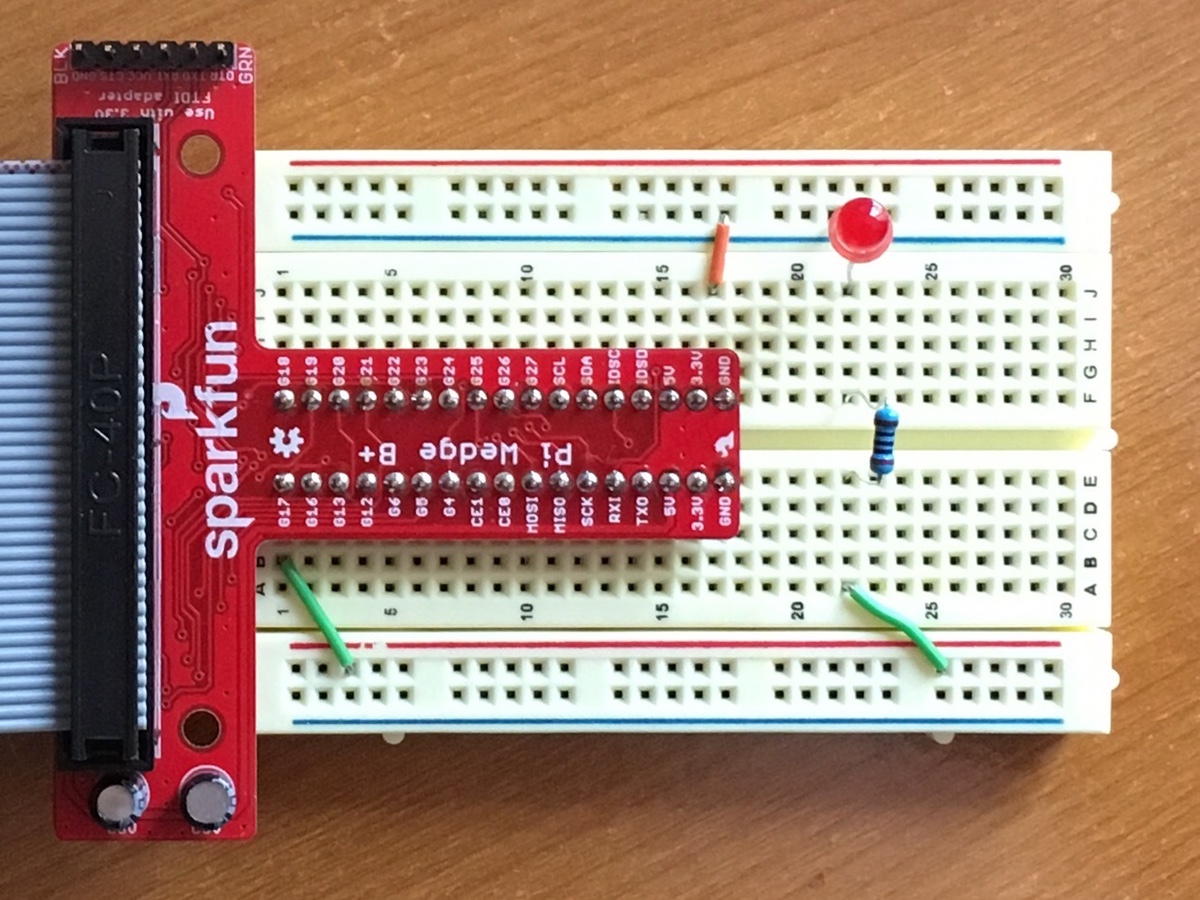
For the first test, connect a 220 Ohm resistor to the 3.3V pin, then connect the resistor to an LED, then the LED to the ground pin on the GPIO interface. I use a Sparkfun Pi Wedge B+ to connect the pins from the Pi to a breadboard. The LED should turn on immediately
For the second test, instead of connecting the resistor to the 3.3V pin, connect it to the G17 pin as shown below.
In the terminal, type:
gpio -g mode 17 out
gpio -g write 17 0
gpio -g write 17 1
The first line declares that GPIO pin 17 will be used for output, as opposed to reading it as you would do for a sensor. The second line turns on the voltage for the pin, and the LED should light up. The third line turns off the voltage to the pin, and the LED should turn off. In Mister Cameron’s tutorial, the -g was omitted, but it is necessary with the Pi Bridge to get the correct pin assigned.
Flashing the LED with SwiftyGPIO
We’re finally at the point of using Swift to flash the LED. Two websites were useful for this: Umberto Raimondi’s post on SwiftyGPIO and the Mister Cameron blog.
The version of Swift on the Pi 1 is limited and lacks several important features, including Foundation and the Package Manager. The Package Manager makes including code like SwiftyGPIO easier. Without it, the files must be downloaded manually and included in the same directory as every project that will use SwiftyGPIO. The first step is downloading the files, so type this in the terminal on the Pi (each of those wget pairs is one line of code):
cd $HOME
mkdir SwiftyGPIO
cd SwiftyGPIO
wget https://raw.githubusercontent.com/uraimo/SwiftyGPIO/master/Sources/SwiftyGPIO.swift
wget https://raw.githubusercontent.com/uraimo/SwiftyGPIO/master/Sources/Presets.swift
wget https://raw.githubusercontent.com/uraimo/SwiftyGPIO/master/Sources/SunXi.swift
wget https://raw.githubusercontent.com/uraimo/SwiftyGPIO/master/Sources/SPI.swift
wget https://raw.githubusercontent.com/uraimo/SwiftyGPIO/master/Sources/PWM.swift
wget https://raw.githubusercontent.com/uraimo/SwiftyGPIO/master/Sources/Mailbox.swift
In the same directory as these files (SwiftyGPIO), open the nano text editor and create the main.swift file, which will hold the code for flashing the LED. Type the following into nano, then close (ctrl-X) and save (Y).
import Glibc
func mainLoop() {
let gpios = SwiftyGPIO.GPIOs(for:.RaspberryPiRev2)
guard let gp = gpios[.P17] else {
print("\n\nCould not obtain pin 17\n\n")
return
}
gp.direction = .OUT
while true {
gp.value = (gp.value == 0) ? 1 : 0
usleep(150*1000)
}
}
mainLoop()
The pins should still be wired as they were in the pin 17 test. Compile and run the app:
/home/pi/usr/bin/swiftc *.swift -v && ./main
The -v flag is verbose mode, which gives you some idea of what is happening during compilation, which takes a minute or two on this rather slow Pi B+. When the code runs, you should see the LED flash quickly, about once a second.
The code above declares a mainLoop function and then calls it. mainLoop first establishes the pin notation for this version of the Raspberry Pi, then checks to see if it can get a reference to pin 17. Assuming it can, it sets pin 17 to be for output and then enters an infinite loop in which it switches the state of the pin (on or off) from its current state, then waits for 150000 microseconds (1.5 seconds). Type ctrl-Z to stop the app. If the LED is on, you can turn it off by typing gpio -g write 17 0.
I encountered two problems while trying to run the app, and after searching around, I found solutions. In both cases, I got a run-time error about an error opening shared libraries, with the first involving libkqueue.so.0 and the second involving libpthread_workqueue.so.0. The search directories page on the Debian package website was a big help, since Raspbian is a form of Debian, and I could search for the library needed for a particular function. The fix for each was simple: installing the required library and recompiling the Swift app.
To fix the libkqueue.so.0 error, type:
sudo apt-get install libkqueue-dev
To fix the libpthread_workqueue.so.0 error, type:
sudo apt-get install libpthread-workqueue0
Neither the uraimo or mistercameron blogs mentioned these errors, so they may be specific to my Pi. If you get these errors or similar ones about shared libraries, check the Debian package site for the name of the missing library, and install it.
Conclusion
Wow. That is a lot of work to flash an LED. Anyone who has used an Arduino knows well that doing this is far simpler on an Arduino. If that’s all you want to do, using an Arduino makes much more sense. But if you want to link simple GPIO behavior, either input or output, to more complicated operations, such as serving up the results via a web server or performing more complicated calculations, doing this on a Raspberry Pi makes good sense. Remember that the real advantage of the Raspberry Pi over an Arduino is that it that the Pi is a full-fledged computer, not just a microprocessor. If you need a real computer, use a Pi. If you don’t need that extensive functionality, an Arduino will be easier and simpler.