Scarlett 2i2 Audio Interface
1/29/23
I got a Scarlett 2i2 audio interface for Christmas, and it has made recording so much easier. Focusrite has a great set of videos for getting set up. From those and my experiences, here are my notes for quickly setting up the Scarlett for 2i2 for recording in GarageBand.
Set up the 2i2
First, make these connections:
- USB hub to Mac
- power to USB hub
- USB cable connecting 2i2 to USB hub
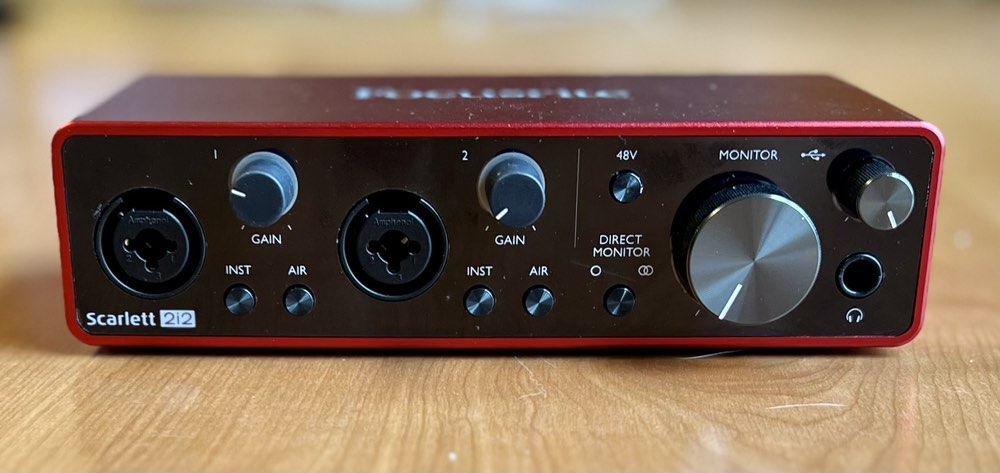
Once the 2i2 has power, turn off any of these lights that might be on: 48V, DIRECT MONITOR, INST, and AIR. The purpose of these and when to turn them on is explained below.
Connect headphones to the jack on the lower right front of the 2i2. The volume can be adjusted with the small knob directly above the headphone port.
Connecting a microphone
Connect the XLR cable from the microphone to one of the ports on the front left of the 2i2. Dynamic microphones (like the Shure SM57) do not require extra power. For them, all you need to do is adjust the gain so that it is green, which you do by turning the knob just above and to the right of the port you’ve connected to. Condenser microphones require external power. To give them that, turn on phantom power by pressing the 48V button, which should light up. If you are unsure if you need external power, consult the microphone’s manual.
To add a mid- to high-frequency boost (an analog effect that emulates a preamp), turn on the AIR button. This makes the sound brighter and less flat, and it works well for vocals. For a microphone, ignore the INST button; this works only for 1/4" jack inputs, and it has no effect on XLR cable inputs.
To hear the microphone with no delay, turn on DIRECT MONITOR once, so that the single circle is illuminated. This is mono mode, which sends both inputs to both headphones. Stereo direct monitoring is available by pressing the button again so that the two intersecting circles are illuminated. Stereo monitoring sends input 1 to the left headphone and input 2 to the right headphone.
Speak or play into the microphone and turn up the GAIN knob until it flashes green; if flashes yellow or red, turn GAIN down.
Connecting a guitar directly
To connect a guitar directly so that you can use GarageBand’s amps and pedals, run a 1/4" cable directly from the guitar to one of the ports on the front left of the 2i2. Turn on INST (instrument) mode when directly connecting electro-acoustic and electric guitars/basses like this, that is, without an amplifier. You are in INST mode if the light is on. If it is not on, you are in LINE mode, which is for connecting everything else, such as amplifers, synthesizers, and digital pianos. You are in LINE mode if the INST light is off. The INST switch is only relevant when connecting via a 1/4" jack; it has no effect on XLR inputs.
Test the instrument, and adjust the GAIN knob so that it flashes green, not yellow or red. Verify that you can hear the instrument in the headphones.
Connecting an amp
To connect an amp, connect an XLR cable from the amp to the 2i2. Turn on the amp.
Test the instrument, and adjust the GAIN knob so that it flashes green, but not yellow or red. Make sure that INST mode light is off. Verify that you can hear the instrument in the headphones.
External speakers
If external speakers are connected to 2i2, turn down the MONITOR dial (the large dial on the right) while recording to avoid feedback.
Set up Garageband
Launch Garageband. Go to menu Settings ... Audio/MIDI, and verify that Scarlett 2i2 USB is selected for the Output Device and Input Device. Close Settings.
Create a new project. In the window that appears that asks you to choose a track type, choose Audio/microphone if connecting a microphone or an amp, and choose the Audio/guitar if connecting a guitar directly so that you can use Garageband’s amps and pedals. Under Input in the lower left, choose the correct input port on the 2i2, 1 being the left port and 2 being the right one. Click Create to add the track.
It will make things less confusing if you rename the track. Double-click on the word “Audio” for the track and rename it whatever you like, like Microphone, GTX amplifier, etc. You can also right-click / control-click on the blue waveform icon to pick a better icon, like a microphone or an amp.
Click on the track, then go to the menu Track ... Configure Track Header, and choose the Record Enable box. Click outside the dialog to save the change. In the track, click on the red dot so that it is flashing red with a white dot.
Press record (the red dot at the top of the window) to start recording, and press the space bar to stop the recording.
Press record-on buttons for the tracks to turn off recording.
Click and drag the volume faders of each track to adjust their volume.
You can add effects to the track using the plug-ins pull-down at the bottom left.