SWIFT AND RASPBERRY PI — AN UPDATE
09/07/2020
Several years ago, I wrote a series of posts on running Swift on a Raspberry Pi and using it to interact with sensors. Several changes have been made to Swift and it’s time to bring that work up to date.
Installing Swift on the Raspberry Pi
After much searching and several failed installations (including my previous instructions on stratigrafia), this post on lickability.org from 25 August 2019 worked. Following its instructions, I could run swift in the REPL, and I could compile and run a simple app. These instructions use the official swift-arm community releases on packagecloud.io. Here are the simplified instructions to install swift 5.
Open a terminal on the Pi, and enter the following to download and install Swift 5 (what looks like two lines — from curl to bash — is a single command on one line):
curl -s https://packagecloud.io/install/repositories/swift-arm/release/script.deb.sh | sudo bash
sudo apt-get install swift5
Next, make a simple Swift program in the terminal:
cd ~/Documents nano hi.swift
In nano, enter the following, then save and exit:
print("Hello, World!")
To run hi.swift in the Swift REPL (read-evaluate-print-loop), run the following in the terminal:
swift hi.swift
To compile hi.swift and run hi as an executable, run the following in the terminal.
swiftc hi.swift
./hi
Swift and sensors on the Pi
Parts and connections
In addition to a Raspberry Pi (I’m using a Pi 3 Model B Rev 1.2), the hardwire for this project consists of the following:
- Breadboard
- DS18B20 temperature sensor
- 470 kΩ resistor
- LED
- 100 kΩ resistor
- Pi Wedge B+ from Sparkfun (the red T-shaped device below), which makes it easier to connect to the Pi’s GPIO pins.
- a few jumper wires
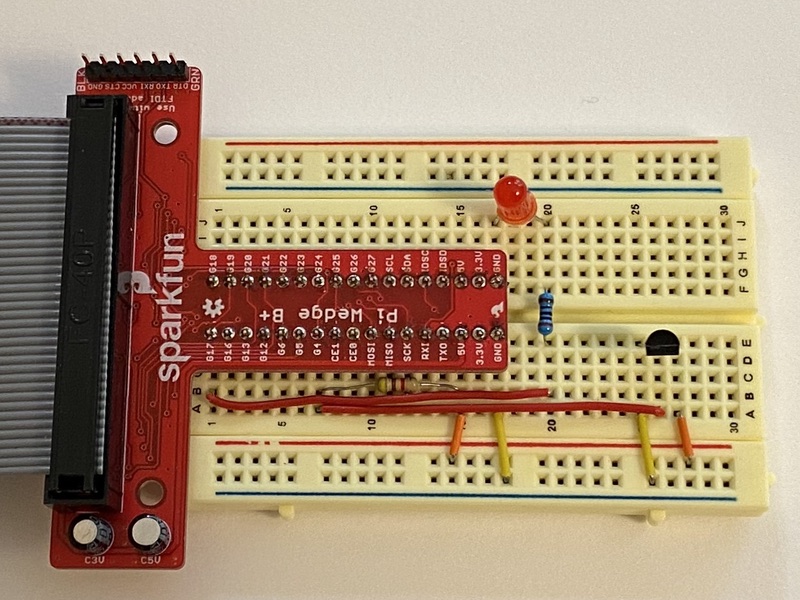
For the connections, the short leg of the LED goes to the ground pin of the wedge, and the long leg connects to the 100 kΩ resistor (blue on this board), which in turn connects to the G17 pin of the wedge. The three legs of the temperature sensor transistor connect to the ground, G4, and 5V pins of the wedge. The 470 kΩ resistor (brown on this board) acts a pull-up between the G4 and 5V pins, to ensure that the signal from the temperature sensor is either 5V or 0V.
Testing the temperature sensor
Before trying to interact with Pi’s GPIO pins through Swift, it is best to first make sure that they work simply through the command line. First, we must turn on the 1-Wire interface needed for the temperature sensor. Open a terminal on the Pi and edit the boot config file.
sudo nano /boot/config.txt
Scroll to the bottom of this configuration file and add the following lines to add the 1-Wire GPIO (w1-gpio) device, then save and exit and nano:
# Enable 1-Wire
dtoverlay=w1-gpio
By default, the 1-Wire interface is connected to GPIO pin 4, which is the temperature transistor is connected to that pin. See pinout.xyz for how to connect GPIO to a different pin. Reboot the Pi for the changes to config.txt to take place:
sudo reboot
After the Pi boots up, type the following into the Terminal to interact with the thermometer transistor:
sudo modprobe w1-gpio
sudo modprobe w1-therm
cd /sys/bus/w1/devices
ls
This lists all of the devices connected by 1-Wire. The temperature sensor will have a number something like 28-00000829c4da. The first two digits for this sensor will always be 28, and the final twelve digits will be unique to your sensor (they are lasered onto the device when it is manufactured). This uniqueness allows many 1-Wire sensors to be run simultaneously, one of the attractions of 1-Wire. To read the value of the sensor, type the following (using your sensor number):
cat 28-00000829c4da/w1_slave
This produces two lines like this:
85 01 4b 46 7f ff 0b 10 5f : crc=5f YES
85 01 4b 46 7f ff 0b 10 5f t=24312
The raw data is returned in hexidecimal in the first part of both lines, with the second part being the translation for humans. The end of the first line tells us whether a valid value was retrieved (as a YES or NO). The end of the second line (t=22625) is the temperature in millidegrees Celsius: it is 24.312°C. The Pi and I provides a full explanation of the output.
Building a Swift app on the Pi
In the terminal, change directories into the Documents directory, then create a directory for the Thermometer project.
cd Documents
mkdir Thermometer
cd Thermometer
Now build the Thermometer project as an executable app:
swift package init --type executable
When this runs, it lists what was created, which is a good bit more than when I wrote about this in 2017. In particular, support for tests have been added. Also, notice the entry point, the main.swift file, is now in Sources/Thermometer rather than just in Sources.
Creating executable package: Thermometer
Creating Package.swift
Creating README.md
Creating .gitignore
Creating Sources/
Creating Sources/Thermometer/main.swift
Creating Tests/
Creating Tests/LinuxMain.swift
Creating Tests/ThermometerTests/
Creating Tests/ThermometerTests/ThermometerTests.swift
Creating Tests/ThermometerTests/XCTestManifests.swift
Change directories and replace main.swift (which simply contains print("Hello, world!") )with a main.swift file with the code below. I found it simplest to generate this on the mac and ssh it over to the Pi rather than use the editor on the Pi.
import Glibc
import Foundation
enum FilePath {
static let device = "/sys/devices/w1_bus_master1/28-00000829c4da/w1_slave"
}
func readStringFromFile(_ path: String) -> String? {
guard let fp = fopen(path, "r") else {
print("WARNING: File could not be opened")
return nil
}
defer { fclose(fp) }
var outputString = ""
let chunkSize = 1024
let buffer: UnsafeMutablePointer<UInt8> = UnsafeMutablePointer.allocate(capacity: chunkSize); defer { buffer.deallocate() }
repeat {
let count: Int = fread(buffer, 1, chunkSize, fp)
guard ferror(fp) == 0 else { break }
if count > 0 {
outputString += stringFromBytes(bytes: buffer, count: count)
}
} while feof(fp) == 0
return outputString
}
func stringFromBytes(bytes: UnsafeMutablePointer<UInt8>, count: Int) -> String {
return String((0..<count).map ({Character(UnicodeScalar(bytes[$0]))}))
}
func temperature(fromString temperatureString: String) -> Double? {
guard temperatureString.contains("YES") else {
print("WARNING: Invalid temperature reading")
return nil
}
let components = temperatureString.components(separatedBy: "t=")
guard components.count == 2 else {
print("WARNING: Unexpected format of temperature file")
return nil
}
var temperatureComponent: String = components[1]
temperatureComponent = temperatureComponent.trimmingCharacters(in:. whitespacesAndNewlines)
guard let milliDegreesC = Double(temperatureComponent) else {
print("WARNING: Temperature string could not be converted to a Double")
return nil
}
let degreesC = milliDegreesC / 1000.0
return degreesC
}
func main() {
while true {
if let tempString = readStringFromFile(FilePath.device),
let tempC = temperature(fromString: tempString) {
print(String(format:"Temperature: %0.1f °C", tempC))
}
sleep(2)
}
}
main()
Most of this code is identical to my 2017 post, so refer to that for more details. One change came with Swift 5, in which deallocate(capacity:) was deprecated, and that is now replaced with deallocate().
In the terminal, build and run the app:
cd ..
swift build
.build/debug/Thermometer
Every two seconds, the app should display the temperature in degrees Celsius. Hold the temperature transistor with your fingers to see the temperature rise. Type Ctrl-Z to terminate the app.
My plan from here is to save these values to a log file on the Pi, which I can use for plotting the data, but also to have the Pi build a webpage that displays the current temperture.