TAKING THE TEMPERATURE WITH SWIFT AND RASPBERRY PI
04/28/2017
I’ve used Swift to blink an LED on the Raspberry Pi, now it is time to do something new with the Pi’s GPIO pins. Today, I take the temperature.
The hardware setup
The hardwire for this project is simple and inexpensive:
- Breadboard
- DS18B20 temperature sensor
- 470 kΩ resistor (4-band colors: gold-red-violet-yellow)
The temperature sensor is available from Sparkfun in two forms. One is simply the transistor, which is only $3.95. The other option is a $9.95 waterproof version, which wraps the sensor in a silver watertight housing at the end of a 2-meter black waterproof cable. Here, I use the watertight sensor, because I can test it in my coffee and in ice water, but either sensor will work for this project.
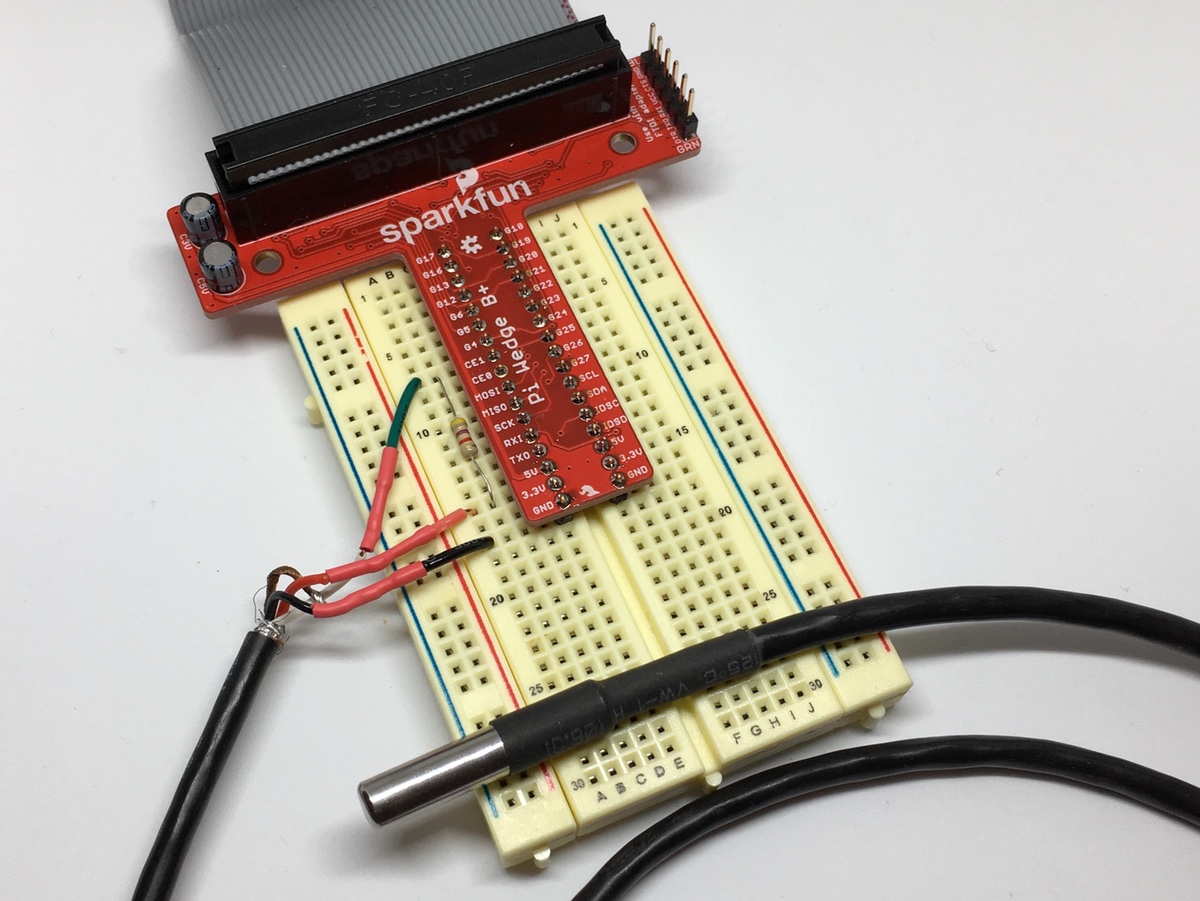
For this project, I’m using the Pi Wedge from Sparkfun, which connects the Pi’s GPIO pins to a breadboard, simplifying circuit setup. When changing any connections, as we’re about to do, be sure that your Pi is powered off. Plug the black wire from the temperature sensor into the same row as the ground (GND) pin from the Pi, the red wire into power (5V), and the green wire into the G4 GPIO pin. This green wire will transmit the data signal. Use the 470 kΩ resistor to bridge between the 5V and G4 rows on the breadboard. This is a pull-up resistor, which ensures that the signal coming from the temperature sensor will either be 5V or 0V.
Testing the temperature sensor
Power up the PI, and establish an SSH connection to the Pi from the Mac. All commands shown below will be entered into this SSH session.
Every type of sensor follows a particular protocol for sending its data to the Raspberry Pi (or Arduino or other controller). The DS18B20 temperature sensor uses the 1-Wire interface. By default, the Raspberry Pi turns off all of these interfaces, so we need to enable 1-Wire on the Pi so that it can communicate with the temperature sensor. Open the boot config file on the Pi to edit it:
sudo nano /boot/config.txt
Scroll to the bottom of this configuration file and add this line, which adds the 1-Wire GPIO (w1-gpio) device:
dtoverlay=w1-gpio
By default, the 1-Wire interface is connected to GPIO pin 4, which is why we connected the green wire to G4. If you need to, you could send the 1-Wire data through a different pin. Exit and save this configuration file (Ctrl-X, then Y), and reboot the Pi:
sudo reboot
After the Pi boots up, reestablish a SSH connection to it. To read the sensor, we need to first find the connection to it. Type the following into the SSH session:
sudo modprobe w1-gpio
sudo modprobe w1-therm
cd /sys/bus/w1/devices
ls
This will list all of the devices connected by 1-Wire. The temperature sensor we are using will have a number something like 28-000003c270f4. The first two digits for this sensor will always be 28, and the final twelve digits will be unique to your sensor (they are lasered onto the device when it is manufactured). This uniqueness allows you to run many 1-Wire sensors simultaneously, one of the attractions of 1-Wire. To read the value of the sensor, type the following:
cat 28-000003c270f4/w1_slave
This will produce a two-line output something like this:
6a 01 4b 46 7f ff 06 10 5f : crc=5f YES
6a 01 4b 46 7f ff 06 10 5f t=22625
The raw data is returned in hexidecimal in the first part of both lines, with the second part being the translation for humans. The end of the first line tells us whether a valid value was retrieved (as a YES or NO), and the end of the second line (t=22625) is the temperature in millidegrees Celsius. In other words, the temperature is 22.625° C. Here is a full explanation of the output.
Now that this is working, we can write a Swift app that will automate getting this temperature.
Building a Swift app on Linux
The instructions for getting started on Swift.org are succinct and will start you with a Hello, World app. Following the same steps, it is straightforward to build the temperature app on the Raspberry Pi, which we will configure to use a temperature sensor to report the temperature every two seconds.
First, if you haven’t already, be sure to add the path to Swift as follows (replacing my user name straton with yours):
export PATH=/home/straton/usr/bin:$PATH
Next, change directories into the Documents directory, then create a directory for the Thermometer project.
cd Documents
mkdir Thermometer && cd Thermometer
Now build the Thermometer project as an executable app:
swift package init --type executable
When this runs, it will show what is being created. In particular, notice the entry point, the main.swift file in Sources.
Creating executable package: Thermometer
Creating Package.swift
Creating .gitignore
Creating Sources/
Creating Sources/main.swift
Creating Tests/
Change directories into Sources, and open main.swift for editing:
cd Sources
nano main.swift
Delete the line that is there ( print("Hello, world!") ) and paste in the code below, followed by Ctrl-X and Y to exit and save the file.
import Glibc
import Foundation
enum FilePath {
static let device = "/sys/devices/w1_bus_master1/28-000003c270f4/w1_slave"
}
func readStringFromFile(_ path: String) -> String? {
guard let fp = fopen(path, "r") else {
print("WARNING: File could not be opened")
return nil
}
defer { fclose(fp) }
var outputString = ""
let chunkSize = 1024
let buffer: UnsafeMutablePointer<UInt8> = UnsafeMutablePointer.allocate(capacity: chunkSize); defer {buffer.deallocate(capacity: chunkSize)}
repeat {
let count: Int = fread(buffer, 1, chunkSize, fp)
guard ferror(fp) == 0 else {break}
if count > 0 {
outputString += stringFromBytes(bytes: buffer, count: count)
}
} while feof(fp) == 0
return outputString
}
func stringFromBytes(bytes: UnsafeMutablePointer<UInt8>, count: Int) -> String {
return String((0..<count).map ({Character(UnicodeScalar(bytes[$0]))}))
}
func temperature(fromString temperatureString: String) -> Double? {
guard temperatureString.contains("YES") else {
print("WARNING: Invalid temperature reading")
return nil
}
let components = temperatureString.components(separatedBy: "t=")
guard components.count == 2 else {
print("WARNING: Unexpected format of temperature file")
return nil
}
var temperatureComponent: String = components[1]
temperatureComponent = temperatureComponent.trimmingCharacters(in:. whitespacesAndNewlines)
guard let milliDegreesC = Double(temperatureComponent) else {
print("WARNING: Temperature string could not be converted to a Double")
return nil
}
let degreesC = milliDegreesC / 1000.0
return degreesC
}
func main() {
while true {
if let tempString = readStringFromFile(FilePath.device),
let tempC = temperature(fromString: tempString) {
print(String(format:"Temperature: %0.1f °C", tempC))
}
sleep(2)
}
}
main()
The first two functions, readStringFromFile() and stringFromBytes(), are slightly modified from Erica Sadun’s code. I tried using the Swift functions String(contentsOfFile: encoding:) and contents(atPath:), and neither worked, but these lower-level functions worked perfectly. My sole change to her code was to check the file pointer for nil.
The function temperature(fromString:) takes the string returned from readStringFromFile() and first checks to see if it is a valid temperature reading. If it is, it returns the temperature value in degrees C. If the reading is invalid or if the temperature cannot be extracted from the string, it returns nil. The main() function is the entry point to the code, and it runs an infinite loop, reading the temperature string, converting it to a temperature, displaying the results, and waiting two seconds.
Build and run the app:
cd ..
swift build
.build/debug/Thermometer
Every two seconds, the app should display the temperature in degrees Celsius. Warm the temperature sensor in your coffee to see that the temperature rises or drop it into ice water to watch it fall. Type Ctrl-Z to terminate the app.
From here, you could take advantage of the computing power of the Pi. You could store the values in a log file. You could perform smoothing functions. You could graph the temperature over time. You could serve up any of these via a web server. All of these are good reasons for doing this on a Raspberry Pi, instead of on an Arduino.